
DIY Custom Closet Organizer: The Brilliant Box System
This brilliant DIY custom closet organizer is not only easy to build, but makes creating your own custom closet configuration both simple and affordable!

Well, things with the master bedroom closet are well under way…

And thank goodness really, between this and the bathroom, I am so done with the renovation mess all over my house! I’ll tell ya, I cannot wait to have a closet again!!!
Last week, I shared our design plans for the space and y’all gushed over that pretty wallpaper and the classic lighting that we chose. Honestly, I don’t blame you – I am head over heels in love with them too!
And friends, they looked even better once we got them up (find the wallpaper tutorial here)!!!
But, as excited as I was to see things looking so pretty, it was the DIY custom closet organizer that I was most excited about. This my friends, is really what it’s all about…

Of course, I wanted a closet that looked beautiful, but the main objective here has always been function. Luckily, we found a way to incorporate both with this DIY custom closet organizer!

Here’s the thing, this closet organizer was built entirely with boxes. Yep, plain and simple boxes. Even better, each box is the exact same size, which makes this the easiest custom closet design EVER!
This really was the most brilliant idea! *All credit to hubs – I had planned a pretty basic, white build that would have had far less wow factor!*
A little turn here and a few extra shelves tucked in there and we had ourselves a perfect custom closet, tailored to exactly what we needed.
Now, I cannot wait to show y’all how we created it!
We started by measuring out our closet space, planning out exactly where we wanted our shelves to be and how big we wanted to make them. Brady, being the engineer that he is, drew everything out to scale on some graph paper, which was such a huge help in figuring out just how big we wanted each box to be.
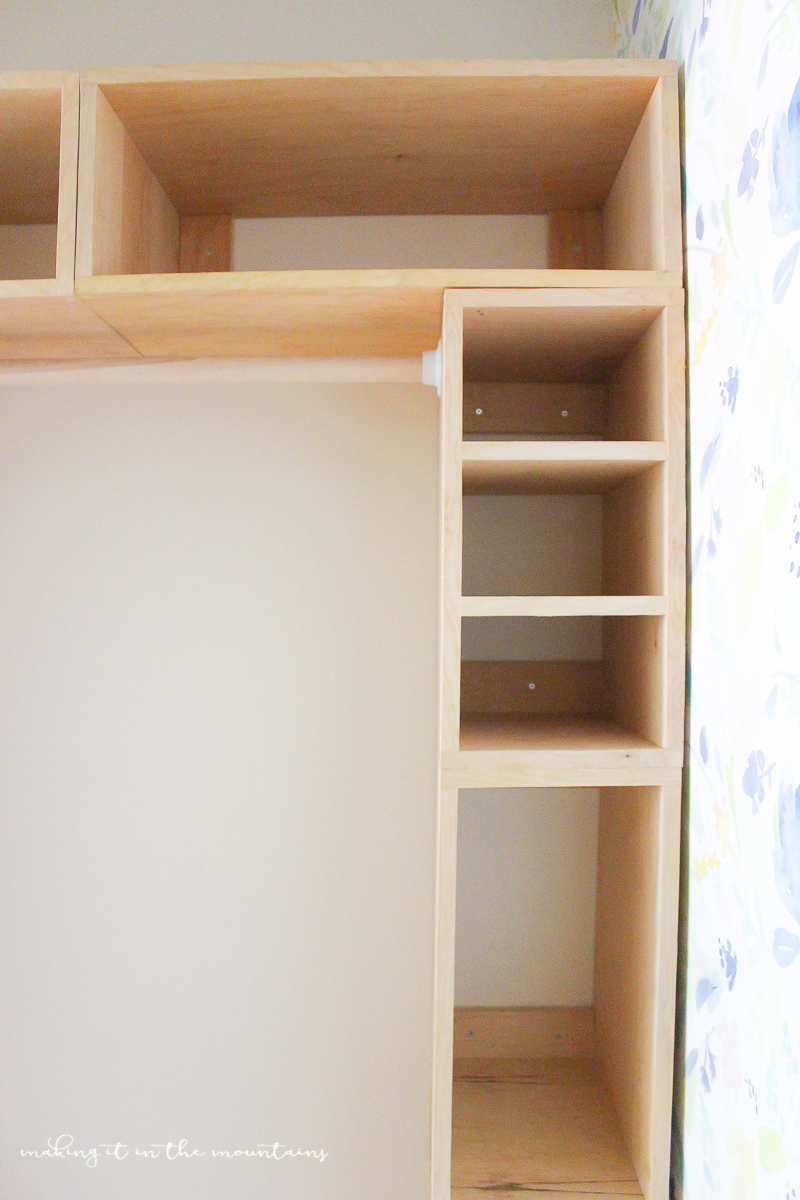
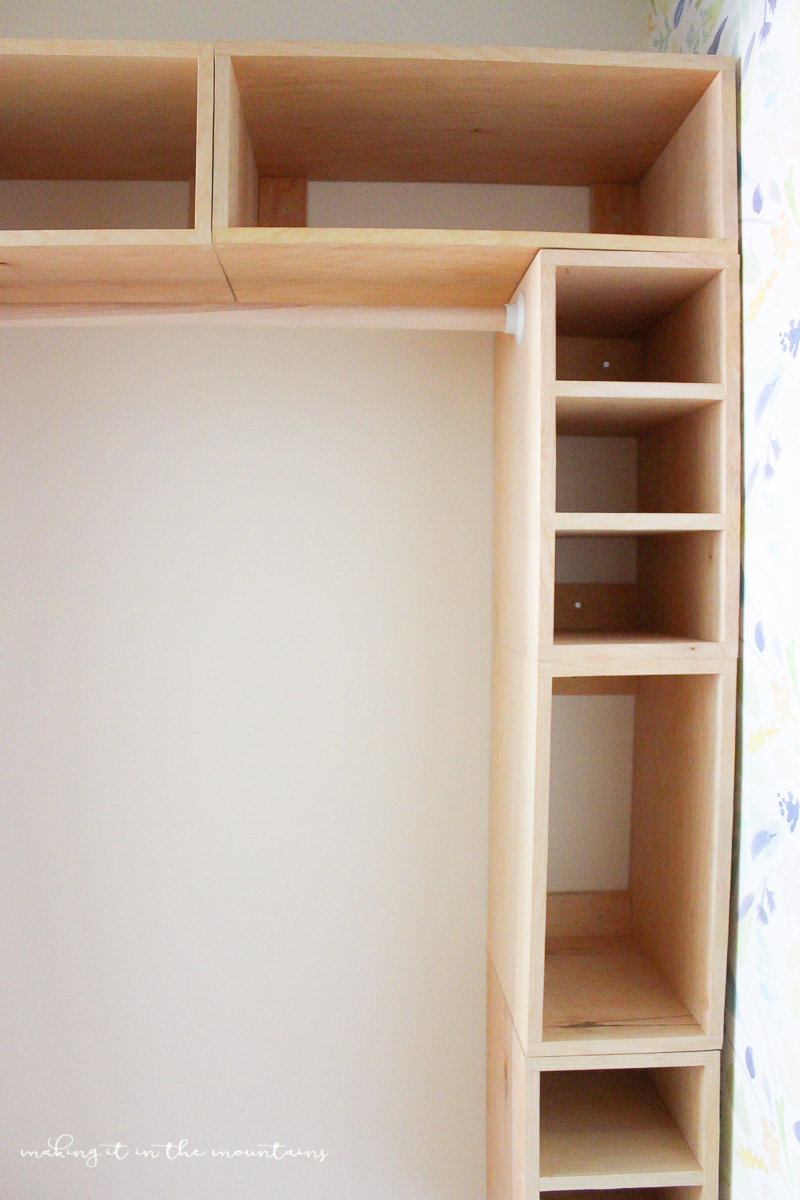
Taking into account the length of our closet, the amount of shelving we wanted to see and the height we wanted it all to be, in the end, we decided on a measurement of 19.5 inches long x 9 3/4 inches wide x 15 inches deep. This allowed us to place three boxes along the top of of our closet, stretching all the way from one end of the closet to the other on both sides. With the length of our boxes decided, the width was sort of an automatic – we wanted to be able to stack two boxes on their sides and have them perfectly match up to the length of another, which meant that the width of a box had to add up to exactly half of the length.
The beauty of this system is the ability to easily customize just by changing the configuration and layout of the boxes. We chose to create some shelf towers by stacking several boxes on top of one another, which still left us with plenty of room for some closet rods to give us some hanging space as well. We also tucked a few extra shelves into the middle of some boxes for even more customized storage.

I swear, this box system made for such easy planning! And the beauty of it all is the ability to tailor the box size to whatever sized closet you’re working with!
With everything all planned out, we headed to our favourite home improvement store to stock up on supplies. Seriously y’all, we love the amazing service & great prices – Home Depot is always our go-to for tools, project supplies and even DIY advice!
Thanks to the helpful HD staff, it didn’t take long to fill up the back of the truck with everything we needed…
– 3/4 birch plywood boards
– wood stain
– matching veneer edge tape
– screws to hold it all together
– wood glue & wood dowels
– closet rod brackets
Brady got right to work building his first box.
He cut his 2 long pieces for the sides (19.5 inches x 15 inches), 2 shorter pieces for the ends (8.25 inches x 15 inches) and 2 small pieces for the back (this is what you’ll use to mount your boxes to the wall – 8.25 inches x 2.75 inches). You can see our measurements in brackets to make our finished boxes 19.5 inches long x 9.75 inches wide x 15 inches deep.

Then, it was just a matter of glueing and screwing them all together. He glued and clamped each piece in place, with the shorter end pieces, sitting inside the longer side pieces, creating the outside of his box.


After drilling some countersink holes, he attached it all together with a couple of screws on each end, through those side pieces right into the end pieces.


Finally, he attached the two back pieces the same way and gave each edge a good sanding.


To create a more polished look, he decided to finish the edges with a bit of veneer edge tape, which simply required some heat from the iron.
Because each and every box was exactly the same dimensions, hubs was able to take a sort of assembly line approach, knocking out all 17 boxes in no time flat.

And then it was my turn … I filled each screw hole with a bit of wood filler and then coated all 17 boxes with a bit of wood stain.
And then finally, FINALLY, it was time to start putting this thing together!
The first step was finding and marking all of our studs so that we would know where to attach our boxes to ensure that our closet would be good and sturdy. We chose to start with the top box of our tower, making sure it was level and then simply adding a couple of screws thought the back pieces of our box, right into the stud. Then, clamping each box to the next, we continued on our merry way, attaching boxes onto the wall until we ended up with a closet full of boxes.

The very last step was putting up the closet rods, using a simple wooden dowel cut to length and a couple of rod brackets to hold it up at either end.


We chose to turn a few boxes on their sides and even added in an extra shelf or two to the middle of some boxes, giving us customized storage for things like purses and shoes.

I couldn’t even begin to tell y’all how much I love our new closet! I really think wood closets have such a rich look to them!


SUCH a big thank you to the wonderful folks at Home Depot for sponsoring this DIY custom closet organizer and making it so darn easy to recommend their great products, wonderful service and helpful staff! We’ve been long time HD shoppers and are SO excited about this opportunity to team up!
I absolutely love how simple this DIY custom closet organizer was to design and build and I cannot wait to fill it all up!

UPDATE: Take a tour of our finished closet here.

Wishing you SUCH a lovely day!
PS. This post contains affiliate links for your convenience. For more information, please see my privacy and disclosure policies.


What a great idea! It looks great and you are going to love it! Can’t wait to see it all filled up 🙂
Thank you so, so much Denise! I’m so excited to finally have an organized closet!
Nice. I love all of the storage space. This will make organization really easy.
Thank you! I’ll tell ya, I cannot wait to have an organized closet space!!!
Holy cow! What a BRILLIANT idea!!!! This is incredible, friend!
Ahhhh, thank you Amber! Total credit to hubs on this one – I can’t believe how simple it was to design and build!
I think the color of the wood is the perfect match for the wallpaper. I would never have thought to design and build my own closet. This looks amazing, Kristi!
Thank you so, so much Sarah! I definitely didn’t have anything quite this special in mind when I asked hubs to help me build a custom closet. I love how it came together and I cannot wait to get all of those cubbies all filled up and organized!
Wow – this is hardcore and very impressive! Totally jealous of all of your great storage space!
Ahhhh, thank you Bre! I’m so excited to get everything organized!!!
wow love this closet!! amazing job and great engineering! Showing hubby but I won’t hold out hope it will happen for me lol.
Awwww, well thank you Millie! I’m SO excited to have a place for everything now!!! Here’s hoping your hubs can get excited about it too! 😉
Closet organization systems can be SO expensive! Using these boxes is so smart. As I’ve been setting up our nursery and collecting all the stuff I need for a baby, I’m realizing I need to come up with a good way to organize in his closet. Babies have SO much stuff! This would be a great way to add a bunch of cubbies to get it organized.
Ahhhh, these would be so perfect to organize a closet for a little one! Thanks so much Jenna!!!
This is fantastic! I would love to have a closet like this! Thanks for linking up with Pretty Pintastic and hope you join us for Small Victories Sunday Linkup too. New one starts 8pm EST Saturday and runs all week.
Thank you so, so much Tanya!!! I love that everything has a place now!
What a smart idea, Kristi!! It looks great while it was really easy to make, congrats to your hubby! I planned to build some built-ins and will use some of your tips.
I am featuring this next week at our Two Uses Tuesday party, don’t forget to stop by and grab your button! Enjoy the weekend!
Thank you so, so much Pili! I’m so excited to finally have a place for everything!
A custom closet organizer is on my to-do list. These boxes are a great idea! You could even turn a few into drawers with simple boxes and drawer slides.
That’s a great idea! Extra drawer space is always a handy thing to have! Thanks so much Kati!
Genius!!! Drooling over your closet!!
Ahhhh, thanks so much Samantha! Can’t wait to share the full reveal this week!
You make it look so easy. Can’t wait to see the finished product. Now all I have to do is teach my hubby how to build boxes 😉
Thanks so much Steph! It really was SO easy – it took a whole day to get all 17 boxes built, but the box design made things so simple to design and build. Good luck!!!
These are neat! My closet could use some serious organizing, too!
Thanks Emma! SO excited to have a place for everything now!
This is brilliant and has completely inspired me in my linen cupboard planning. It’s a totally ‘vanilla’ space right now, but box storage like this could really help keep all those bits and bobs in place!! Fabulous work Kristi – I hope you get to hang some fun, flirty date night dresses in there too! 😉
Thank you so, so much Erin! I’m so thrilled to hear that you’re feeling inspired! I think this system could be such a great way to organize a ton of different spaces! Thanks again friend!
These are awesome!! I have a closet in my office that definitely needs redone to something like this! I can see it now- these amazing boxes filled with office supplies!!
Thank you so much for sharing to the Monday Mish Mash Link Party!
*Hugs*
Oh good! They’re be SO perfect in an office space too! Thanks so much Amy!!!
I’d say this box system does look brilliant! Thank you for the step-by-step instructions. You’ve inspired me–I agree with you that wood closets do look good.
Thanks so much for joining the Grace at Home party. I’m featuring you this week!
Oh, how exciting! Thank you so, so much! I’m thrilled that you loved it enough to share!
I really love coming on your site a couple of times a week and leisurely looking around with my morning coffee, but I have noticed that the ads are getting more invasive, especially the one for Frozen, covering the WHOLE page and the ads are now on each photo you’ve posted. I don’t know if anyone has mentioned this to you. It’s a shame. I know that you have affiliates and that is great, but the way their ads are displayed really interferes with a users enjoyment of your site (its not just yours—I’ve noticed the change in the number of ads on other sites as well, but today is the first day that I’ve seen one cover a WHOLE page.)
Oh no, thank you so, so much for bringing this to my attention Debbie! There shouldn’t be any ads that completely take over the page and the image ads are supposed to be minimal. Will definitely be looking into this. Thanks again!
The idea of using same size boxes in ingenious! Can you tell me the length of each closet section and how many sheets of plywood it took to complete the project? I’d really appreciate the added info. Again, great job and thank for sharing.
SO happy you love it Debbie! Each of our boxes measured 19.5 inches long, so that was the length of each little section. We used 3 boxes on each side of our closet so the overall measurement on each side totalled 58.5 inches. We used 17 boxes in total, but I’m so sorry, I can’t remember the number of plywood sheets that took to make. Hope this helps! Let me know if you have any other questions.
Hi Kristi! I’m ‘refreshing’ my home and combining two closets in my master bedroom and just love what you and Brady have built! I’m trying to figure out how to cut my 3/4″ birch plywood to get the most use of the wood but find I have quite a bit of waste. Could I ask what size plywood sheet you used and how Brady cut it for minimal waste? I appreciate your response!
Hi Chris! I’m so happy you’re feeling inspired! The sheets we used were 4×8. Brady put together a cut list, that I’ve forwarded to your email address. Feel free to reply to that if you have more questions. Thanks again!!!
Hello Kristi,
This looks amazing and I can’t wait to tackle this project myself for our dream home. Would you be able to forward the cut sheet to me as well as I’m also having a hard time figuring out how to cut with the least amount of waste.
Thanks for reaching out Vilma! I’ll see if I can dig out that cut list to send along to you too.
Hi Kristi.
We’re you able to find the cut file? I never received it.
Hi Vilma, I’m so sorry, but I can’t seem to find it saved on my computer or email. We’ve had such a busy summer, but I will try to draw another up as soon as I can. So sorry to keep you waiting.
Kristi- we are thinking about doing this box system for our master closet. After using it for awhile now, do you still like it? Do you have any modification suggestions? And do you think we could get by with 1/2” plywood instead of 3/4”? Thank you for this post and for helping us figure out what to do with our closet!
Hi Moriah, I’m so happy to hear you’re thinking about trying this system too. We absolutely love our closet, it’s functioned so perfectly for us. And I definitely think you could get by with the 1/2″ plywood instead. Hope this helps!
Do you recall the cost and cut I please get the cut list as well?
Hi Anika, I’m so sorry, but we didn’t actually keep track of the cost or save the cut list for this project (I will be sure to next time though!). Sorry I can’t be more helpful!
Just what I was looking for! I was trying to figure out how to do this. I think I could do this! Yours turned out lovely.
Oh good! I’m so happy you found this helpful Rita!
Love it! Wish you could just buy the pre made boxes. Thank you
I was tired of all the closet designs occupying precious floor space. You have no idea how important your post was for me to visualise and design something fpr my own wardrobe.
I was doubtful how much ply wood can take when directly installed on the wall. Also I don’t have a side wall to provide corner support.
Basically my design involves boxes mounted on a flat straight wall, however your idea has given me some hope regarding the same.
Thanks a lot.
seems like a lot of wasted wood. making most of them with 3 sides instead of 4 would save time. the ones that are against each other do not need 2 layers of wood. You could have saved about 1/4 of the price and some time.