
Our Biggest Renovation Yet – Design Plans for our Farmhouse Kitchen + Living Room Space
Okay friends, here we are nearly three months into our biggest renovation project ever…

And, though I’ve whined and complained about the chaos of it all more than a few times, and I’ve even shared a few updates along the way (on the blog and especially through my Insta Story updates), I haven’t actually sat down to share what we’ve dreamed up for the space.
Y’all have been asking about what the heck we’re doing for months now and I totally get it, sharing the reno progress without sharing any actual plans for the space is definitely a backwards way of doing things. But honestly, between all the holiday fun, renovation chaos and all sorts of general real-life busyness, I just haven’t had the time (or frankly the brain power) to actually sit down and write it all out.
But today my friends, I’m going to do just that.
Maybe we should start with a quick look back at what we started with…


That big old wall separating our kitchen and living room space has been the thing we’ve hated most about our home since the day we first laid eyes on it. Even before moving in, we knew it had to go.

And that’s right where this whole renovation got started, removing the drywall, re-routing all of the electrical and hvac hiding within it, building some temporary walls and finally, removing that big old structural wall and replacing it with a new engineered beam (which we were able to tuck right into our ceiling, wahoo!).

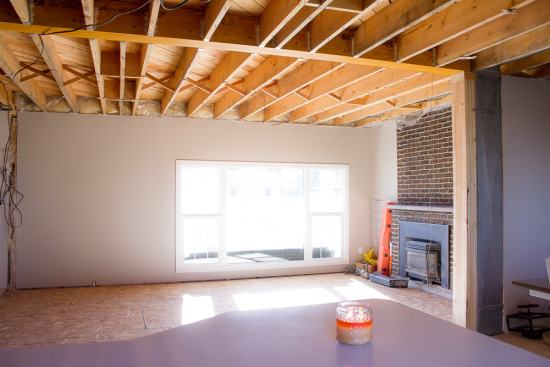
And then, because removing that dividing wall would be completely pointless if we left the sunken living room floor in place, we tore it out completely too and rebuilt it all to sit level with the rest of our main floor.


Obviously this was all a ton of work. Messy, overwhelming, take over your entire life sort of work. But oh my goodness we knew it would be SO worth it in the end to create one big, open space that we could hang out in with all of our family and friends!
Creating one big, open space was absolutely at the top of our list of priorities, but there were a few other problems we wanted to address through this renovation as well. With zero (yes ZERO) lights in our living room and just one teeny-tiny light in our entire kitchen, lighting was obviously another big concern for us. So, with the ceiling already opened up to install our structural beam (and the repairs to that already looming), we chose to tear the rest of the ceiling out throughout the main floor to install all new lighting throughout. Not only did this give us a chance to add a whole lot of pot lights to our living room, kitchen and the back hallway/ pantry, but it was also the perfect opportunity to re-align our dining room chandelier and front entry light, the offset placements of which always drove me a bit mad.
With most of the construction and electrical work behind us, it was time to give ourselves some walls, floors and a ceiling once again (all of which I had been missing terribly!) and finally start pulling this new space together.
To replace our ceilings, we chose to install a beautiful primed tongue + groove throughout our entire main floor. Not only did it fit perfectly into our rustic, farmhouse design, but it was also a cost effective option that we could install ourselves (with no mudding and taping!!!). It was a big job, taking us about four long days to install, and then another two days to paint (Cloud White from Benjamin Moore in case you were wondering), but I couldn’t be happier with how it turned out. I just love the rustic charm it brings to the space!


With the ceiling was in place, it was time to move on to painting out the dark brick fireplace (watch for a tutorial on that soon) and all of the walls, both new and old. I stuck with my tried + true faves – Benjamin Mooore’s Cloud White for the fireplace and Edgecomb Gray over all of the walls.


And then finally, FINALLY, with all of that messy work behind us, it was time to start installing our beautiful new hardwood floors! I had a pretty clear picture in my head of the perfect light-medium, rustic hardwoods, but I’ll tell ya, knowing exactly what you want can sometimes make finding it harder than you’d expect. I hunted high and low for weeks, making my way to every flooring store I could find (sometimes even twice) looking for those perfect floors. And then, by total accident, I actually bumped into them in our little local, small town hardware store of all places, now who would have thought?!

These perfectly rustic, light-medium toned, wire brushed oak wood floors (we went with the Kaslo) were exactly what I’d been picturing all along. And, as if bumping into them completely by accident weren’t enough to convince me it was meant to be, the entire collection is actually named after towns in the Kootenay Mountains, which is where we lived back when I started this little old blog of mine. Now, if that’s not fate at work, I don’t know what is!
Each step along this journey brought us closer to the home we always knew this house could be, but oh my gosh, when those gorgeous floors went in, this big old house of ours really, truly started feeling like home.
I’ve been sharing all sorts of behind the scenes video through my Insta Stories all along the way and y’all have been full of questions about our paint colours, cabinetry, lighting choices and most of all, our new flooring. So today, I thought I should take some time to answer each and every one of them and of course, finally share the design plans for our new farmhouse kitchen + living room…
Farmhouse Kitchen Design Plans

You guys, I started planning this farmhouse kitchen in my head long before we ever even moved into this big old house from the ’70s. White cabinets, wood countertops, some lovely vintage style touches…
Finding those perfect floors may have darn near killed me, but friends, piecing together this farmhouse kitchen was surprisingly easy!
I’ve been pinning away all sorts of light + bright kitchen spaces for ages now (you can find them all on my farmhouse kitchen board), so I had a pretty good idea of what I wanted.
Simple shaker style cabinets in a creamy white with maybe just a few contrasting greige pieces thrown in…

{source}

{source}

{source}
A beautiful mix of warm wood counters with some more polished white quartz…

{source}
A farmhouse style apron front sink…

{source}
Some lovely vintage inspired lighting…


{chandelier} {bell pendants}
And just a few shiny pops of chrome…


{cabinet knob} {cabinet pull} {bridge faucet}
Because I had such a clear idea of what I wanted in terms of cabinetry, I didn’t want to mess around with trying to make premade cabinets work within our space or my design, so we opted to have them all custom made instead. This was by far the easiest and very best way to ensure we got exactly what we wanted including all sorts of fab organizers and extras! We decided to go with a traditional shaker style door with some extra trim work for the sides + bases and of course, some classic crown mouldings around the tops. I also wanted to play up the charm + character even more, so I worked with our cabinet maker to add a few extra design elements to our island as well as the cabinet under the sink (I cannot wait to share more about those pieces soon!). Those extra details might seem small, but they make SUCH a difference to the overall look and feel of the space! We chose to paint out most of the cabinetry in Benjamin Moore’s Cloud White, but wanted to bring in a subtle contrast by painting out the island and sink cabinet with Revere Pewter, which is just a shade darker than our wall colour (Edgecomb Gray in case you were wondering). Though the rest of our door hardware throughout the house is matte black (read more about it all here), I really wanted to make this space feel light + airy, so I opted for these chrome pulls for all of the drawers and these knobs for our cabinet doors.
To bring a bit of warmth to the space, I’ve always pictured beautiful butcher block counters. We decided to have our countertops made by our cabinet maker out of hickory because we wanted its strength + heartiness as well as that rich colour variation. Though I did decide to bring in some white quartz for our island to keep things feeling light and bring in a more polished element to the space.
I’ve wanted a white apron front sink for as long as I can remember, and with glowing reviews, this budget friendly option was an easy choice. And how gorgeous will this vintage inspired bridge faucet from Brizo look sitting above it!

For appliances, after a ton of research, we decided on this fantastic KitchenAid line from The Brick…


{dishwasher} {fridge} {induction range}
And finally, for the lighting I’ll be keeping my very favourite chandelier hanging over our dining table and then I’ve ordered a couple of these simple bell shaped pendants in nickel to hang over the island.
All these years of dreaming up kitchen designs in my head have helped me to build a pretty clear idea of what I want our kitchen to be and how I want it to function, but choosing each separate element is always a bit of a daunting task. I cannot wait to see how everything comes together!

And now, onto the living room (don’t worry, this one’s not nearly as exhaustive!)…
Farmhouse Living Room Design Plans

Now obviously, with the kitchen and living room being so open and connected to one another, it’s really important to keep the main design elements continuous through both spaces, making them feel like one, big space. To ensure that these two rooms merge together seamlessly, I’ve chosen to stick with the same rustic wood floors, the same tongue + groove ceiling, and the same wall and trim colours.
I also ordered up this dramatic vintage style light (from the same collection as our dining room chandelier) to hang in the front entry just off of our living room space.

Because this is a space that we plan to gather with all of our family and friends, we wanted to make sure we’re adding in plenty of seating while still keeping things comfy + cozy for those evenings that we want to curl up together for a family movie night. I can’t wait to share the furniture we’ve ordered up with y’all next week, but for now, just picture a big old sectional in a rich linen fabric with a few soft chairs on either side of that newly painted fireplace.
Some luxurious linen curtains will help cozy up the space as well (not to mention providing us some much needed privacy from all those neighbors looking for a reno update every time they drive by – not that I blame them).

Friends, since the day we first laid eyes on this old house from the’70s, we’ve had such a clear vision of what this space could become. This has hands down been the biggest, most challenging renovation we’ve ever taken on (let alone lived smack dab in the middle of), but as the finish line gets closer, I’m growing more and more sure that it’s going to be every bit as amazing as we’d hoped!
Stay tuned for more updates soon my friends! And of course follow along on Instagram for all sorts of sneak peeks along the way!


Wishing you such a lovely day!


All is lovely. Flowing seamlessly. We just finished our kitchen an 3 living areas… what a lot of stress to live with! I’m cant wait to see your home come together
Oh my gosh, it’s SO stressful! But I’m so darn excited to see how it all turns out too! Thank you so much Jill!
I can’t wait to see your new space.
Everything is beautiful.
I’m sure you are excited watching everything come to life for you.
Rose ❤️
Thank you so much Rose! I’m dying to see how it all turns out!
Just love everything Kristi!! Can’t wait to see everything finished and put together (as Im sure you are 🙂 )
Ahhhh, thank you Tiffany! If we ever make it through this to the other side, I’ll have to you over for a tour and visit! xo
I was wondering about your apron sink base, did you make it or buy it?