
Who Knew that Painting a Stencilled Wall Could be SO Easy?
Have you been dying to try painting a stencilled wall, but it just seems like SO much work? You won’t believe how quick and easy it really is!!!

Okay. Let’s be honest here, painting a stencilled wall is a daunting task. Especially after reading post like this that make it sound like it might just be the hardest thing I’ll ever do.
Which is probably why it took me so long to try it. But boy, am I ever glad I did!
Not only did I end up with a gorgeous feature wall that makes my heart skip a beat every single time I look at it (even months later), but it was SO much easier than I had expected!
Seriously!
If you’ve been thinking about painting your own stencilled wall, I’m here to tell you that it’s really not as difficult as you might think.
Ready to hear all my secrets? I cannot wait to show you how easy it was to create this beautiful stencilled wall in just a few short hours!

Armed with this beautiful stencil, a bit of painter’s tape and a some plain old paint roller covers I set to work.
I marked a centre point along the top edge of my wall and matched the middle of my stencil to it, lining the top edge of my stencil up with the line of our ceiling. I used a level to make sure everything was nice and straight and then simply used a bit of painter’s tape to attach the stencil to the wall and hold it in place.
*Tip one: Triple check that the first stencil is straight – every bit you add after it will build onto that first one.*

With the stencil securely mounted on the wall, it was time to get painting! I loaded up my paint roller, then rolled it along the top of my paint tray to remove any excess and finally, rolled that paint right over top of the stencil.

Tip two: Don’t mess around with an itsy-bitsy stencil brush, bust out that paint roller to make quick work of things!
Honestly, this was a trial run that I was REALLY hoping would turn out. I figured that as long as I didn’t load a ton of paint onto my roller, I might just be able to avoid using a little stencil brush (and of course, save myself days of painting!). You can imagine how happy I was to discover that I was right!
Tip three: Ahem, don’t load a ton of paint onto your roller!
Once the entire stencil had been covered in paint, I ripped carefully removed it from the wall to make sure there was actually a pattern left behind and what do you know? Success!
The rest was just a matter of matching up the next stencil edge to the last, made easy by the built-in stencil markers, and painting over it once again …


I continued along with this until the entire wall had been covered.
There were a few other things that I learned along the way…
Tip four: Alternate sides.
Because the paint is wet, moving the stencil onto a spot you just finished painting could be a bit tricky. By simply moving to the other side of my centre starting point, I was able to give each new area a chance to dry a bit before matching the stencil over it. Obviously, this was easier the further things moved along, as I worked my way out from the centre.


Tip five: Use a trim guard to paint any edges.
Using a trim guard like this not only made quick work of painting against any edges or inside corners, but it also did a great job of pushing the stencil right into those corners so that I could continue the stencil pattern right to the edges of my wall.

I couldn’t believe how quickly this all went!
I had all 20 ft. of this wall covered in a gorgeous pattern in just over three hours. This big stencil really did help to make quick work of that wall!


And, though I loved the stencil I had chosen, I hadn’t imagined loving the outcome THIS much!


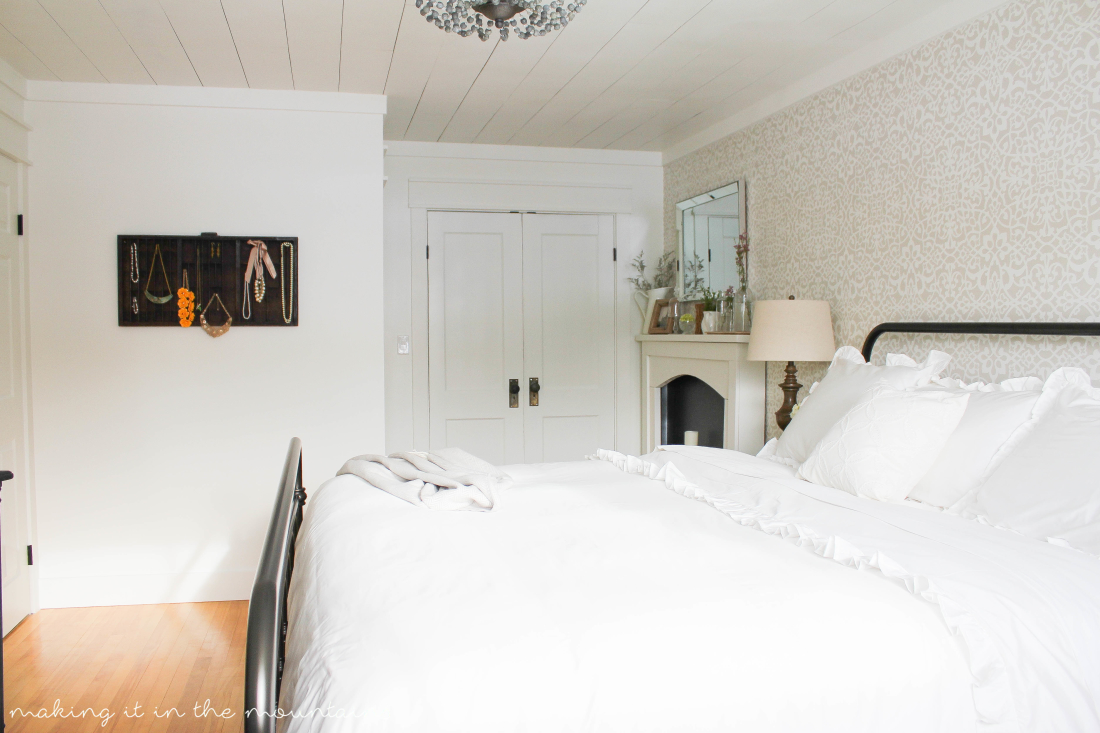


This gorgeous stencilled wall really was the most perfect accent for our farmhouse style master bedroom, don’t you think?

So what do you think, are you feeling ready to take on your own stencilling project?
Find tutorials for all of our Farmhouse Master Bedroom Projects below:


Wishing you SUCH a lovely day!


I do love the way it turned out, it’s beautiful 🙂
Thank you so, so much Joan! I’m so happy with it too!
It’s gorgeous! Did you have any issues with paint building up on your stencil and then not making a clean edge? I’ve had that problem in the past when I tried to stencil a large wall. I used a small foam roller. What type of roller did you use?
Thanks so much Faye! I did notice it building up a bit and stopped to clean the stencil up in the middle of the job – though I’m sure it was a product of this giganto wall. 😉 I used a regular old roller to paint it all (I linked to the exact one in my post). Thanks again!
Your bedroom is beautiful and refreshing.
Awwww, well thank you Aileen! I’m so happy you love it!
I love this. I have been wanting to do this. but I have horribly textured walls in my condo 🙁 Yours turned out great!
Thanks Shayla! We’ve got some rooms like that too (why?!). Not sure what we’re going to do to cover it, but I’m working on it 😉
Well done! I think stencil the wall behind the bed is pretty hot right now.:)
Thank you! I absolutely love how it turned out!
Beautiful!! where did you purchase the stencil?
Thank you Janet! I posted a few direct links through my post (there’s one right near the beginning), but I found it at Royal Design Studio. Thanks again!
These are SUCH great tips! I have been wanting to do a stencil wall in our hall bathroom, but I am so nervous! I pinned this for when I get the courage to do it!
Carrie
curlycraftymom.com
Awwww, Carrie – it was SO much easier than I’d imagined!!! You’ve got this girl!
Oh Kristi, I wish I would have used a corner guard when I did my wall. I remember having to pull out the stencil brush and using a lot of curse words on that part. Thanks for the tip! Your wall is so pretty, love the stencil you used.
Thanks Marie! It was still a bit tricky, but much easier than it could have been. Thanks again!
Kristi this is STUNNING. I didn’t realize that you could get such a great result so easily! I want to go stencil everything now! Great tutorial. I’m going to pin it for when I find the perfect wall to stencil!
Awwww, well thank you Evelina! Honestly, it was SO much easier than I had expected!
I just love it so much!! I’ve been thinking about adding a stencil wall somewhere in our house, and when I’m ready I’m definitely going to keep your tips in mind!
Thank you Brandi! It was far easier than I’d imagined! I’m already planning out another. Happy painting!
This turned out beautifully! I can’t believe that whole wall only took you 3 hours! I am so tempted to try this now for my home. You make it look so easy!
Thank you Celeste! I had been expecting some long days of painting – it was so much easier than I had expected!!!
Gorgeous! I have not stenciled a wall that large yet, but did do a small bathroom wall once, and I too was surprised at how easy it was! Your bedroom is so pretty.
simply amazing!! you are very patient. 🙂 The color is so pretty, too.
Thanks so much Gena! It really was so much easier than I’d imagined! Totally worth it!
Wow, this is beautiful!! Really makes your room pop!
Thanks so much Cheryl! I absolutely love how it turned out!
Good Morning Kristi…O.K. you have officially inspired me! Now I need to find a good room to try out this skill. Hmmm…several are popping into my head right now! I’ve pinned it to refer back to it.
Thanks…Lynn
Thanks so much Lynn! I’m thrilled that you’re feeling inspired! I really love how it turned out!
Kristi, you did a beautiful job — the result is stunning. I’m inspired to stencil a few walls, but first we need to get the floor tile down. I saw your link at Kathryn’s Make it Pretty Monday party.
Thank you SO much Ann Marie! It makes me so happy to hear that you’re feeling inspired to paint a few of your own! Happy painting (and tiling)!
Hi Kristi…Found you on the Tutorials and Tips Link Party. I have done wall stencils before…I completely agree that a lot of the instructions out there make it seem a lot harder than it really is. Thanks for the really easy to follow tips! And your bedroom looks beautiful!
Thanks Wanda! I would have tried this so much sooner if I’d known it was so simple to do! Already on the hunt for my next stencilling project. Thanks again!
I love how this turned out! I just did a dining room and had trouble getting into the corners. So that tip was great advice!
Thank you Krista! I’m so happy you found it helpful! Those corners were definitely tricky, but the paint edging tool really helped keep everything pressed down right to the edge and of course, made sure the paint stayed where it needed to! Thanks again!
Wow! I am so impressed that you got it looking so perfect, well done! I love the colour too, so calming.
#wednesdayshowcase
Thank you SO much Nancy! It’s not quite perfect, but I love it!
Your stenciled wall is wonderful! It looks like lace. I’ve been wanting to stencil on our sliding doors, but like you said, it sounds so daunting. Thanks for showing that it wasn’t too hard. Now I just need to find a stencil that I love (hopefully a big one like you found).
I’m so happy you’re feeling inspired to take it on Rebecca! I’m sure you won’t have any trouble find one (or a zillion) that you love! Happy painting!
The transformation is beautiful! You inspired me to stencil my one wall I’ve been wanting to do. Love your paint colors. Could you share the name & brand?
Thanks so much Debbie! I’m so happy to hear that you’re feeling inspired! The white paint I used is Cloud White and the greige paint is called Edgecomb Gray, both are from Benjamin Moore. Happy painting!
The room is gorgeous! Just wondering what you did along the ceiling…Is that a piece of trim?
Thanks so much Chrissy! Yes, it’s a piece of trim we used as “crown moulding”, mostly to cover up any uneven edges from our DIY planked ceiling. 😉
Saw this on the Pretty Project Party! Love how it turned out!
Awwwww, well thank you Yami! I’m so happy you love it!
Simply gorgeous! I love the tips that you gave as well! Thanks for sharing at Your Inspired Design!
Thank you so much Holly! I’m so happy you found it helpful!
This is so gorgeous! I ADORE that stencil and the colour you chose! Thanks so much for sharing with the Wednesday Showcase!
Awwww, well thank you Cristina! I’m so happy you love it!
Wow amazing, looks like ton.. but its worth it, looks beautiful
Maria Dream Create and Inspire,
Thank you SO much Maria!
I could not love this more! Awesome job and it looks so fabulous in your bedroom. Pinning!
Thanks so much for sharing your creativity at the The DIY Collective this week! Hope to see you again next Thursday. The party begins at 6:00am EST.
Hope you had an awesome weekend!
~ Ashley
Thank you SOOOO much Ashley!!! SO happy you love it!
Your wall is absolutely stunning! The pattern is absolutely perfect!
Cat
Thanks so much Cat! SO happy you love it!
This is so pretty. It looks very elegant….Christine
Thank you SO much Christine! I’m really so happy with how it turned out!
I love this! You make it look so easy. I love the window frame on the wall too.
I want to stencil an accent wall, but I just can’t bring myself to do it in a rental. One day!
Thanks so much Meredith! I’m so happy you love it! I definitely hear ya about the rental, you could try a smaller stencilling project (furniture, back of a bookshelf, window, frame it) in the mean time maybe? Thanks again!
You know.. I just picked up a cabinet that I’m going to repaint, and it may be perfect for that! Thanks for the idea!
This wall is amazing! I can’t believe using the roller worked so beautifully. I’m trying to figure out where I can try this 🙂
This is so pretty! It finished off your room just beautifully Kristi! Thanks for sharing how you did it, definitely pinning for future use!
Cheers,
AJ
Thank you SO, SO much!!! I couldn’t be happier with how it turned out!
Very pretty!
Thank you so, so much Debbie!
That wall really makes such a great statement! Love it. Thanks for sharing with the Pretty Project Party! xoxo- Heather
Thank you so much Heather! I’m so happy you love it! I couldn’t be happier with how it turned out!
That is beautiful!
Thank you so much Sherry!
Kristi, I am so impressed with your stenciled wall. That was alot of work and it turned out beautifully. Congrats on being selected as one of our stars at Your Inspired Design. Please keep coming back.
Thank you SO, SO much Carol! I’m so happy with how it turned out! Thank you SO much for sharing it!
This is so pretty, both the colors you chose and the design. It looks like wallpaper but so much nicer.
Thank you SO, SO much Debra! I couldn’t believe how simple and inexpensive it was to do such a large wall and I am so happy with how it turned out!
Hi there! I just love your style. I’m wondering if you could tell me what the paint colors are that you used on the Master bedroom for the stenciled wall? And also what color you used for the other walls? I just love this room and would love to do this in my home.
Thank you SO much Chrissy! SO happy you love it! The white paint is called Cloud White and the greyish-beige is called Edgecomb Gray – both are from Benjamin Moore. All of the other walls, trim work and ceiling are Cloud White as well. Let me know if you have any other questions and thanks again!
Thank you so much for sharing this information with me. I just LOVE everything you do.
SO happy to help! And thank you so much for your kind words Chrissy! Happy painting!
What a fabulous idea to add some texture to a wall!! Will definitely have to try this! Thank you for sharing this with us!!
Thanks so much Sam!!!
Would this work on a textured wall? Or does it need to be a smooth finished wall? Also what where the names of the products you used?(paint ,wall and stencil color, & stencil) thank you !!
I’m so happy you love it Staci! I think it would be really difficult to paint a stencil on a textured wall, but I haven’t tried it myself. The wall colour is Cloud White and the stencilled colour is Edgecomb Gray, both are from Benjamin Moore. The stencil I used can be found here: https://royaldesignstudio.refersion.com/l/d2b.56778. Hope this helps!