
Paint Dipped DIY End Tables
You won’t believe how easy it is to build your own custom DIY end tables!
As promised, we’ve been hard at work on a few fun projects behind the scenes here in the Mercer house. In between park play dates, 1/2 marathon training and a ton of golfing, this long weekend has been the perfect chance for us to finally tackle some of those projects we’ve been meaning to do for much too long.
Since moving into our new home late last fall, and simply dropping some furniture into it, our living room has felt like a bit of a mess. It’s clear to us that none of our furniture really seems to fit well into the space. With summer almost here, most of our time will be spent outside and so, making over this living room isn’t really isn’t a priority for us at all right now, but we thought it would be nice to slowly cross things off the list as the opportunity comes.
Here are a few things we’d like to do just to help the room function a bit better for us by the time winter rolls around again.
1. Buy a smaller T.V. to mount on the wall & move the current one downstairs (and of course, get rid of that old coffee table from our college days in the process!),
2. buy a larger rug to fill the empty floor space,
3. find a coffee table to put our feet up on,
4. hang a clock on the wall so that we can actually know what time it is,
5. find smaller end tables that better fit the space & move the current ones (which I still LOVE) downstairs,
6. find a fireplace mantle (hopefully in time for this year’s Christmas stockings!!!),
7. purchase rustic table lamps,
8. find a way to add seating without overcrowding the space.
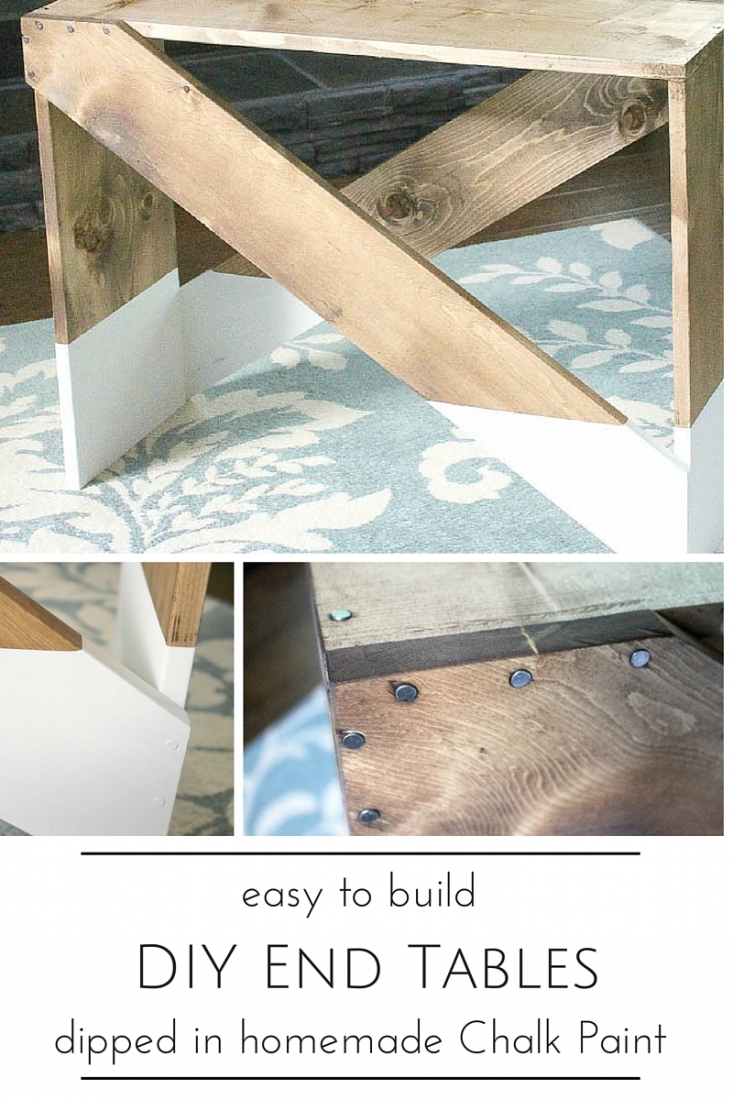
While working on another project (more on that later this week!), I happened across plans for some end tables that looked simple enough to make and the thin profile seemed like they would fit our space well. Instead of “pinning for later” and forgetting all about them, I instantly sent a link to Brady at work and asked him if it was something he wanted to do. I was down at the hardware store the next day picking up the supplies and Brady spent a few evenings last week banging them all together.

You can find detailed plans by Ana White on her blog here, which by the way, is an absolutely fantastic resource if you ever want to build anything, seriously ANYTHING! Because we wanted a rustic look, we chose to use nails rather than screws to fasten everything together.

After Brady was done with the hammering, I sanded down all of the rough edges, banged and dented the top a bit with some tools to “distress” it, and then stained both tables with my fave new stain.
Though I really loved how the colour turned out, something about them didn’t look “done” enough to me. I’ve seen a ton of furniture on Pinterest lately with a “dipped” in paint effect and I’ve been just itching to try it myself. I liked the idea of adding some colour to the living room to break up all of the brown (floors, sofa and chairs, pillows) and this seemed like the perfect way to do that – I know what you’re thinking: how adventurous am I classifying white as a colour?! … I blame you Mom! Keeping in mind that I want to keep the colours fairly neutral in the living room, the only paint I had on hand that would work was my Annie Sloan Chalk Paint in Old White, which was unfortunately a bit creamier than I was looking for. Living in a small town, there aren’t really any options to buy chalk paint without ordering online, so I REALLY wanted to make what I already had work, but, knowing I’d be settling, I just couldn’t make myself do it. Cruising pinterest paid off yet again when I came across this post by Liz Marie Blog and I realized that I could make my own! SO, instead of waiting for something to come in the mail, I took the opportunity to cross another item off of my DIY bucket list – DIY chalk paint.
Because I didn’t want to be too overwhelmed with choices when I went to the hardware store with a toddler in tow (making decisions is not my strong suit at the best of times), I did a bit of research about the “best” white paint colours to help me narrow down the options. I found a ton of helpful articles: this one on Houzz did a really great job not only listing the paint colours, but the undertones of them and how best to use them; and this one by House & Home broke up the most popular whites into brands. I wrote down a few from brands that I knew were available where I was shopping. It truly was SO helpful to have the choices narrowed down to only a few out of what felt like hundreds of whites! I also found it helpful to focus on the darkest shade on the sample card to give me the best idea of the colour undertones. I knew I was looking for a warm white, but without too much yellow to it. With only three colour samples in my hand to pick from, Cloud White by Benjamin Moore was the clear winner!

Using the recipe above, I mixed up my paint with a bit of non-sanded grout, custom chalk paint in the perfect shade of white and, after very carefully measuring and taping off the parts I wanted to “dip,” I painted out the bottom with two coats of my homemade Could White chalk paint.
Here’s how it all turned out:


I am beyond thrilled with the results!!! That’s one less thing on our wish list for the living room and it really does make the space function so much better for us!
Stay tuned as we reveal another project later this week … it’s my absolute favorite so far and I promise you won’t want to miss it!!!
Wishing you SUCH a lovely week!
PS. This post may contain affiliate links. For more information, please read my disclosure and privacy policies.


Love these, Kristi!! You’re so right about the dipping effect. It really makes the tables look finished and custom. 🙂
Thank you SO much Christina!!!
Very nice Kristi! Love your color choice of stain and the dipping gives a good contrast to the darkness of the surrounding furniture and floor. I like that they are narrow but wide enough to be stable. Good job!
Thank you SO much! I’m really so happy with how they turned out!!!
I love this look!!! Pinning 🙂
Thanks SO much Kelley!!!
Love love love these! They turned out great! I always admire the rustic look but I like how you modernized them with the white dip. Definitely need to try that recipe for chalk paint too!
Thank you SO much Bre!!! It’s SUPER neat that we both shared dipped tables this morning!!!
That wood tone is absolutely PERFECT and the dip just ties it all together! Love the design you did for these tables – the cross bar pattern is super unique and something I would like to try to make for my own home. PS your gallery wall is to die for!
You are SO sweet! Thank you so much Erica! The tables were pretty easy to make, you could totally make yourself some too! Have a fabulous week !
Love these tables! It was good to see how ‘dipping’ actually works;0) Way to create just what you need!!!
Thank you Jayleen! That’s the best part about DIY … it’s always just the right piece for the space!!!
this looks great! loving the dip-dyed look. Thanks for the easy tutorial!!
Thank you SO much Ashley!!!
Your tables came out great. I like the cross bars and how you dipped the legs. Thanks for sharing it on Merry Monday.
Thanks Erlene!!!
These look great with the space you have! So cool!
Thank you Renee!
Love these Kristi! I need to try this dipped effect too. It’s so cute!!!
Thanks Nicole! I’m SO happy with the way they turned out too!
This is awesome! I will have to make a table like this!! (And my “I”, I mean my husband) HAHAHA!
Hahaha! Yes, that’s what I always mean too! Thanks Kaylin!
I love your new table!!!! I’ve pinned that one before but have yet to getting around to it so I commend you for getting the job done so quickly! I think it would be cool to make a couple of them and use them as nightstands, maybe make them a little smaller.
I also love how you dipped them in your DIY chalk paint…very clever!
Thank you SO much Selene! They would make gorgeous night stands! That’s the best part about DIY, you get to make exactly what you’re looking for. We made ours a bit longer to match the depth of our couch and they fit perfectly. Thanks again for your kind words Selene! I’m sure yours will go just as smoothly 🙂
Loving this so much 🙂 I’ve really wanted to dip some furniture, must give it a try myself! #pintorials
Thanks Kate! It’s definitely a fun look!
These look fantastic! Thanks for sharing at #Pintorials 🙂
Thank you!!!
this looks so super simple, pinning for all my friends!! 🙂 xo, jess
http://www.dreamingofleaving.com
Thanks so much Jess!!!
LOVE these! I’m definitely pinning these & putting these on our to-do list! 🙂
That’s great! Thank you SO much Amy!!!
This is gorgeous! I am always surprised at how easy it is to make my own furniture that looks great. I can’t wait to make stuff like this for my next house. Thanks for linking up with Hump Day Happenings!
Thanks Jenna! To be honest, the more we try, the more surprised we are at how easy it is to make just what we need 🙂 Thanks for stopping by Jenna!
Such a fun and simple idea for a custom look! Would love for you to share at Fridays Unfolded this week!
Alison
Nancherrow
Thank you SO much Alison! Heading over now 🙂
These look so neat. My mom would love to have these in her den. You did a really great job.
Thank you so much Leslie!!!
You are one busy woman! Training and blogging takes a lot of time so kudos to you for accomplishing both! Love how this turned out and so glad you shared it at Frugal Crafty Home Blog Hop!
Thank you Carrie! It’s not always easy to find the time to do it all, but I’m enjoying it all so much, it’s always worth it 🙂 Thanks for stopping by!
I <3 your dipped tables, chic and rustic! Pinned
Thank you SO much Michele! Hubby and I are both so proud of them 🙂
What a fun project! I love that you shared how to make the DIY chalk paint!
Thanks for sharing at Wow Me Wednesday!
Thank you so much Tshanina! Have a fabulous weekend!
I am sooo loving this table….we are building a house, the living room is pretty small, and we have lots of wood/brown, this table is PERFECT, a narrow table that is mostly wood, with a pop of color. LOVE IT. Thank you so much for sharing this, I have wanted to try chalk paint for a long time, and I will be using your recipe. I too, am from a small town, so I would have to order this, now I can make my own. Thanks again
Oh Kim, I’m SO happy this was helpful to you!!! I hope your home building journey goes smoothly – I’m sure you must be so excited!
Kristi, these tables are so great! It looks like they are simple enough to make too….win, win! Pinning and saving for a later project…and when I have figured out where to put them in my tiny house =)
Thank you Cassie! They were super easy to make and I’m in love with the rustic touch that they bring to our space! The best part is that you can make them to any dimension that you need.
OK when I first saw this I totally thought it was made with a pallet! Thanks for sharing at Cook it! Craft it! Share it! Hope to see you back next week and it looks great in front of the picture wall you shared a few weeks ago!!
Thank you so, so much Kelly!!! I’m really very happy with how they turned out! They definitely add a rustic look to contrast with that polished gallery wall 😉 Thanks again! Have a lovely weekend!!!
Love this! We are featuring your awesome project at Your Designs This Time tomorrow! Thanks for sharing with us!
Emily & Erin
Oh wow! Thank you SO much Emily and Erin!!!
Thanks for sharing this on The Weekend Social. Can’t wait to see how your house is progressing.
Thank YOU Erlene!!! I’m having a ton of fun getting all of these projects done, but progress is always slower than we hope 😉
Great job on the end tables! Creating the “dipped” look really made them special!
Thank you SO much Richella! I definitely think the “dipping” gave them a fun twist!
I love these tables! Such a great idea…and so different.
Thank you Deb!!!
Awesome job! You’re being featured today as part of my Friday Features series! http://homecomingmn.blogspot.com/2014/05/friday-diy-features_30.html
Thank you, thank you, thank you Kayla!!! Can’t wait to check it out!
LOVE IT! I am going to have to make some of these! 🙂 So simple and easy, too. thanks for sharing this!
I’m thrilled that you love them so much Kristina!!! They were SO quick and easy to put together and look perfect in our space! Don’t you just love {custom} furniture?!
I never cared for the dipped look until I saw these. They look great in the room. Would have been cute too with a lower shelf.
Thank you SO much Judy! I know just what you mean with that “dipped” trend! And they would look great with a lower shelf too!
Looks Fab Kristi!
Thanks so much Maria!
Looooooved this one and love it still!
Awwwww, well thanks so much Amy!!! xo
I love the look of these tables Kristi!!!
Thank you so much Summer!!!
Awesome Kristi! So creative – they turned out fantastic!!
Awwww, well thanks Krista!!!
This is so awesome! I love it!
Thank you so, so much Jenn!