
How to Make Wine Cork Chargers
For all you wine lovers out there, today we’re sharing how to make wine cork chargers.

I don’t know about you, but here at North Country Nest, we’re not ones to turn down a bottle of wine. There’s just something so calming about sitting down after a long day with a nice glass of vino and letting it all unwind.
Naturally, a few wine corks began to accumulate and the DIY’er in me started to think we could make something fun with them. I soon solicited the help from my grandma who then in turn asked all the ladies in her condo building. Within a month or two I had enough corks to get started… on something.
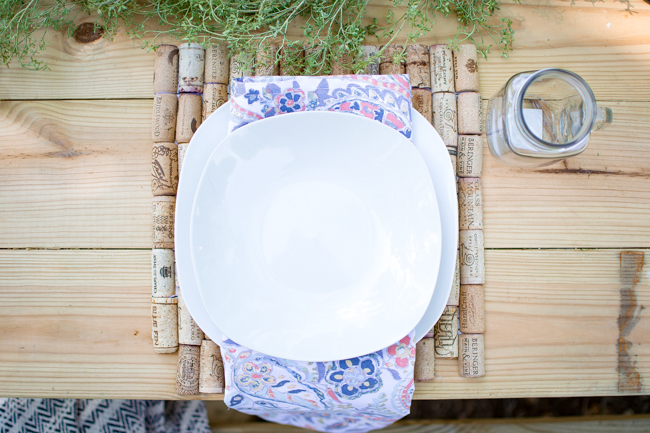
I happened to have a summer tablescape blog hop coming up and decided wine cork chargers would be the perfect addition to the table decor.

The Supplies
Wine corks
12×12 scrapbook paper
Hot glue gun
Microwavable container with water
Knife
Cutting board
The How-To
First, the wine corks need to be cut in half. To make the whole cutting process a little easier, microwave them with [not inside but scattered around] a bowl of water. The moisture makes the corks expand and easier to cut. I found the best time was between four and five minutes.
After cutting all your corks, start in a corner of the piece of paper and glue down each cork half.

I found that it works best when you use generally the same type of cork. You know, there’s the plastic-type ones and the real cork ones. When you mix and match, they don’t line up as nicely because of the varying sizes.

Work your way down until the entire piece of paper is covered.

I then went back and glued the ends together so the paper wasn’t so floppy.

And that’s it!
Now, if you need me, I’ve got another wine cork project to start collecting for 😉

All my best,


Thank you sooo much for the tutorial! I loved it! So easy and so fun to do! 🙂
Thank you, Julia!
Very nice!
Thank you, Kelley!
So cute 🙂
Thank you, Chelsea!
A fabulous look! Now I need corks
Great DIY project! thanks for sharing at the #HomeMattersParty hope to catch up with you again next week! Nina @ Vintage Mama’s Cottage
Thank you so, so much Nina!