
How to Install New Windows with Wood Siding: Everything you Need to Know About DIY Window Installation
Thinking about installing your own windows? It’s a great way to save a ton of money and it’s so much easier than you might think! Don’t miss this step-by-step guide all about how to install new windows with wood siding.

Replacing old windows is a big decision.
It’s a pretty significant investment, making it something you’ll likely have to live with for many, many years to come.
First, you’ll want to make sure that replacing those old windows is actually worth your while – here are 8 questions you can ask yourself.
Then, you’ll want to be sure to consider these 6 things before choosing your new windows.
Knowing you’ll be living with these new windows for years decades to come, you’ll definitely want to make sure you get it right!
It’s no surprise that replacing the old windows in your home can be a costly endeavour and, though there are so many ways you’ll reap the rewards of that investment, there are some ways to keep costs to a minimum. Instead of compromising on the quality or efficiency of your new windows, why not take on the job of installing them yourself?
Paying someone to install your windows can often cost half as much as the windows themselves!
Learning how to install new windows yourself will save you thousands of dollars, ensuring you’re spending your hard earned money exactly where you should be – on the windows themselves!
Now, I know it sounds daunting, but I promise friends, it’s easier than you’d think!
Today I’ll be sharing everything you need to know about how to install new windows along with a ton of pictures to help you through every step along the way.
It’s important to note that because we have cedar siding, our installation process was much more involved than it would have been with vinyl siding – because we couldn’t just lift up our siding to pull out the old window, place in the new one and then throw the siding back down over it, we had a few extra steps to walk through.
But friends, if we can do it, ANYONE can!

How to Install New Windows

one: Pry off any trim around the window.
This one’s pretty self explanatory. Use a pry bar to remove any trim around the inside of the window, taking care not to damage your wall.

two: Remove the old window.
There are actually a few ways to get this job done and which way you choose to go with will be entirely dependent on your own current windows and home. We pulled out the actual glass windows themselves simply by lifting them up and out of the frame. Then, we removed the window track and old wooden frame with a pry bar and a bit of elbow grease. We found it easiest to make a few cuts around the corners of the frame to pull it out in pieces rather than pulling the entire thing out all at once.


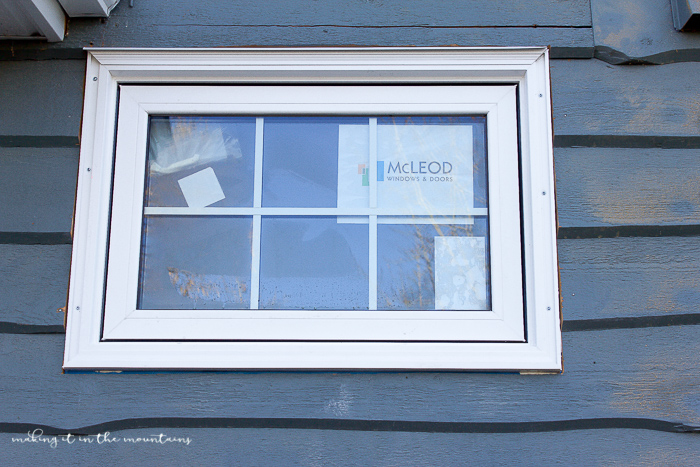
three: Dry fit the new window.
With that old window out of the way, it was time to dry fit the new window so that we could most accurately see where we needed to cut away our siding. Because we couldn’t simply lift up the siding around our windows, we had to work with renovation windows, which mount from the outside, rather than with a nail fin under the siding. This meant our new windows would have trim that was much wider than our old windows, making it necessary to cut away a bit of our siding to sit flush with the edge of that new trim.
In order to get the most accurate cut line, we decided to place our new window in the opening to trace it. And, in order to make sure we traced everything just right, we had to make sure it was sitting exactly where it would be after installation.
First order of business was making sure that any nails in the old nail fin were out of the way – because we planned to remove the entire nail fin once the siding was cut out of the way, we just bent them down to the sit flush with the window frame with a hammer.
Once the window was sitting in place, we also had to fit it with a few shims to ensure it was perfectly level and centred.


Then, we traced around the outside edge of the window, holding our pencil directly level around the edges of the window frame, leaving us with a perfect line to cut away.


four: Cut away the extra siding.
Using a circular saw set to the right depth (just a hair shallower than our siding to ensure we didn’t break through the house wrap or wall) and a brace to ensure a straight cut, we cut away the extra siding from around our window frame. With the excess siding out of the way, we were now able to remove the old nail fin as well.


five: Weather proof the window cil.
With all the caulking we were going to use to install it, it’s unlikely that any water would ever get behind that window, but just to be extra cautious, we decided to install some added weather barrier along the bottom of our window framing.


six: Install drip flashing.
To further protect our windows from the elements, we also installed a piece of drip flashing tucked under the siding directly above the window.


seven: Caulk around the window.
The first step to actually installing the new window was to place a bead of caulking all around the inside of our actual window frame edge. We were sure to leave a few gaps along the bottom to allow a place for moisture to escape if it ever did manage to work it’s way in.

eight: Get that new window into place.
Finally, it was time to lift that new window into place. Once we had it all levelled out with shims once again, we pried away the renocation brick mould covers and drilled a few holes along each edge to screw into. We then added our screws to each side, mounting everything in place once and for all.


We found it easiest to do the two sides first, then reattach those brick mould covers with a white rubber mallet before working on the top and bottom edges.
nine: Caulk all around the outside of your window.
Add a bead of outdoor caulking all around the outside of your window, sealing it to your house.

ten: Fill any gaps with spray foam and install trim.
The final step was to spray some insulating foam around the windows from inside our home and then of coarse, cover it all back up with some pretty trim (find the tutorial for our farmhouse style trim here).

That’s it my friends!
With one weekend’s work, we saved ourselves thousands of dollars in installation fees and I honestly couldn’t believe how simple it was to do!
These gorgeous new windows have made all the difference to the look and functionality of our home, both inside and out!


Friends, it’s no secret that replacing old windows can make a HUGE impact on the look, feel and functionality of your home, not to mention the value they can bring. It’s also a big commitment, one that will live on in your home for decades to come, which is why it’s SO important to get it right. There are so many things to consider, but there’s no question that your very top priority needs to be finding a reputable company willing to walk you through the entire process and provide you with great quality windows that will stand the test of time!
We’ve been SO lucky to have walked this journey with McLeod Windows & Doors!
![]()
HUGE thanks to McLeod Windows & Doors for sponsoring this post, answering countless questions and making it so darn easy to recommend their incredible products and service!
Wishing you SUCH a lovely day!


Kristi your new windows look absolutely gorgeous. It always seems like such a big task until you tackle it yourself and realize how much you learnt and save in the process. You guys did an amazing job and your installation instructions are beautifully written and so easy to understand.
Thank you so, so much!!! They’ve made SUCH a difference to the look and feel of our home and you’re absolutely right, it did feel like the biggest job until we actually got going with things. SO glad we took it on ourselves – we learned so much and saved a bundle while doing it! Thanks again!
After completely remodeling and upgrading my house myself over the last 2 yrs, I’ve decided to put in a half bath with a window. I’m installing the window myself this weekend. Love your step by step process. Thank you so much.
Oh wow Kim! Good for you, that’s amazing!!! I’m sure you’re going to love it!
I’ve been all over the internet. this is the best step by step for what I am planning to do!
Thank you!! amazing!!